1-26-26

Period 4– great start with fidget toys. I have the first batch printed and more on the way.  If yours was printed, pull apart the supports, throw them in the trash and see how it freely it can move.

Period 5 – great job last Friday with our Arduino/Tinkercad work.  We ended with a built circuit and a program that made (at least) one light blink.

UPDATE: we are still unable to use the real Arduinos with school computers.  The Arduinos worked in another school computer lab last October and do not work there either. SO, that means that something change between October and now on the school computers or network that prevents Arduino from downloading.

Today, your goal is to make the lights blink in this sequence:
button pressed
red LED blinks
red LED stops blinking
blue LED blinks
blue LED stops blinking
green LED blinks
green  LED stops blinking
all lights off

Remember – you only need:
-ONE void setup function
-ONE void loop function

You will add more code into these functions to make the lights blink.

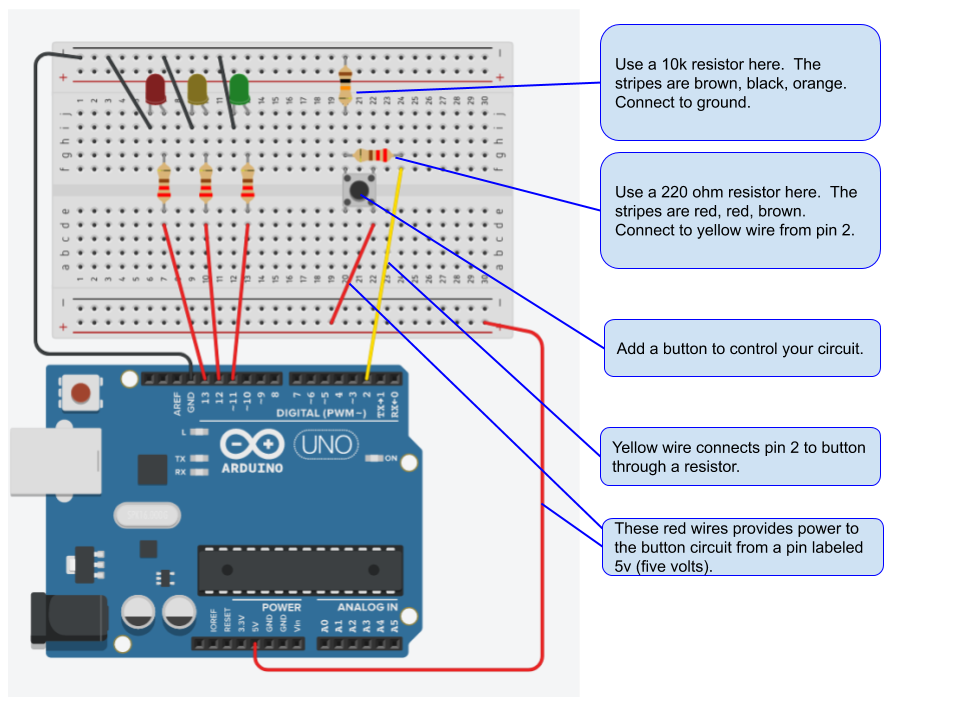
Here’s some diagrams to help you out!

1-23-26

Happy Friday to all of you!

Jonathan our IT specialist is continuing to troubleshoot problems with the Arduino program.  This means we can’t upload our programs to a real Arduino yet.

Don’t be sad though: we get to work on our Tinkercad circuits.

Today’s skills:
-adding an button
-using an if/else statement

Together: 
1. build a circuit with at least three LEDs.
2. add a button to control when the LEDs blink.

On your own:
Add to your code so that the LEDs blink one after the other when then button is pressed.  Like this:
button pressed
red LED blinks
red LED stops blinking
blue LED blinks
blue LED stops blinking
green LED blinks
green  LED stops blinking

Turn in your completed Tinkercad with working buttons.

1-21-26

Today we will build your first actual, real life, Arduino circuit.

It will be based on the multiple, blinking LED circuit that you built and programmed in Tinkercad. 

BEFORE we begin:

  1. Use components as instructed.
  2. Do not attempt to damage or damage any provided materials.
  3. Clean up after yourself and pick up any loose components – even if you they aren’t from your build.
  4. Return all components to the bins at the end of class.

We won’t leave until the room is clean and all components are return to the bins on my desk. Even if the bell has rung.

1-20-26

  1. If Jonathan joins us today, we will try Cinemagraphs and see if we can troubleshoot a solution.  If he isn’t hear, we will hold offer on Cinemagraphs  until a future class. If it doesn’t work at all, I will make the assignment optional

2. Now, let’s animate in Photoshop!
Download these images:
field
ufo

3. Now you get to make three animations on your own.  Click here for requirements for the Photoshop First Animation assignment. 

1-16-26

Let’s keep going with Circuit Building!

today: we continue working together on our Intro to Arduino. 
1. parts of an Arduino.
2. make a copy of the circuit that we made in our last class.
3. name the copy YourLastNameBlinking like MilsteadBlinking.
4. we will add in the following items:
-a breadboard
-an LED on the breadboard
-a resistor
-color coded wiring
5. use code to make the LED blink!

Your next assignment: Blinking Multiple LEDs


1-12-26

Period 4:
1. Class updates and what’s new.
2. Survey results.
3. Let’s explore Photoshop Animation with a Cinemagraph

Period 5:
1. Class updates – new late policy.
2. Presentation: What is an Arduino?
3. Together: go to tinkercad.com and create an account.   Use an email that you can access on your own.  Click the Create a personal account button. 

4. Together: we build circuits in Tinkercad.
5. Together: how to share and turn in an assignment on Tinkercad.