Welcome back
1. Open up Inkscape on your computer. This will take at least 20 minutes to launch so I want you to start it NOW. Trust me.
2. Continue work on your dream structure project. Click here for details.
Welcome back
1. Open up Inkscape on your computer. This will take at least 20 minutes to launch so I want you to start it NOW. Trust me.
2. Continue work on your dream structure project. Click here for details.
Today’s goals:
Complete and submit your MultiMeter design as an attachment to Bvarvil@tamdistrict.org
Create a blog post titled “CAD/CAM with PlasmaCAM”. On this post, include:
Copy and address the prompts in this post:
1)”What is the goal of this CAD/CAM Project as you understand it? What are the learning goals as you understand them?”
2)”Describe your project. What is it? What does it do?”
3)”Describe the measurements that are critical for this project to be successful”
today’s work
1. open up Inkscape on your computer – it will be SLOW. Trust me. Just open it.
2. your goal by the end of the class period:
-revise flash drives as needed
-complete/submit the 3d designed insect kit
-complete at least 60% of your 3d designed structure
today
first 45 minutes – finish and submit your flash drive OR make adjustments to your printed flash drive design. If you have finished and submitted your flash drive you may continue to work on your 3d printed insect kit.
15 minutes – making a 3d printed box
last 30 minutes – finish your 3d printed insect kit and submit it here.
next project – 3d printed structure
Finish your flash drives TODAY. Submit them here.
1. based on the measurements that you made of the flash drive it’s time to design. Using your design worksheet, draw an image of your design. Be sure to include measurements of the design itself. You are limited to a final design that is no larger than 60mm x 100 mm.
2. Start designing. Begin by designing the space (hole) that will hold the flash drive itself. This is a good time to measure the flash drive AGAIN. Measure twice, cut once. A significant part of your grade is based on how well your measurements accurately allow for the flash drive to be hot glued into the 3d print.
3. After you have built the hole you may begin designing the outer case.
Part 1: setting up your tinkercad.com account
1. USE THE CHROME BROWSER
2. point your browser to www.tinkercad.com
3. click on the “create free account” button. Note that you must be over 13 to create a tinkercad.com account.
Part 2: tinkercad basics – in 10 minutes or less!
Part 3: your first design – the keychain – click here
Today’s Agenda
(5 min)Teams test marble mazes as a team. Identify trouble areas that need to be addressed by putting a post-it on the trouble area.
(15 min) Team members that have trouble areas on their panel have 15 minutes to try to correct. Team members with no trouble areas go to computer lab, get started on their blog homework.
(10 min) Class comes together as a whole and marble mazes are tested 10 times each. Video is to be captured for the blog post described below.
Marble Maze Project – final project blog post
This is to be completed in class or as homework by each team member.
This blog post is to be written in complete sentences and should include the following:
1. Describe what you learned over the course of this project. LIST ALL TOOLS YOU USED in this project and tell your readers which of these tools you used for the first time. How did you improve as a builder in this project?
2. Consider all of the tools that you used and tell us which tool you feel most comfortable with, and why. Then blog about which tool you would like to become more comfortable with using.
3. Describe what challenges you encountered in this project and how you overcame them? Consider and explain how your design changed over time. If you could do the Marble Maze project all over again what would you do differently?
Each TEAM should upload a video to YouTube that shows a successful run of the marble through their maze and the entire board. Embed this video in your blog post. Follow this link if you need help with embedding a YouTube clip in a WordPress blog post.
Answer: for each of these class dates you should write a description of your project progress for the day. There should be photos of your work as well as images of you using tools and fabricating the maze. These are the dates: 1/8. 1/12, 1/13, 1/15, 1/20, 1/22.
You will also write a summary blog post after the project has been completed.
Varvil instruction (20 min)
Hole Saw Bits
Belt Sander
Bell Installation
Chute Installation
The Hole Saw is a helpful tool for cutting large circles. Many of you have bells mounted within a wooden piece, like the example below. This circle (the arrows are pointing to this circle) is a challenging cut for the bandsaw. I recommend using a hole saw instead.

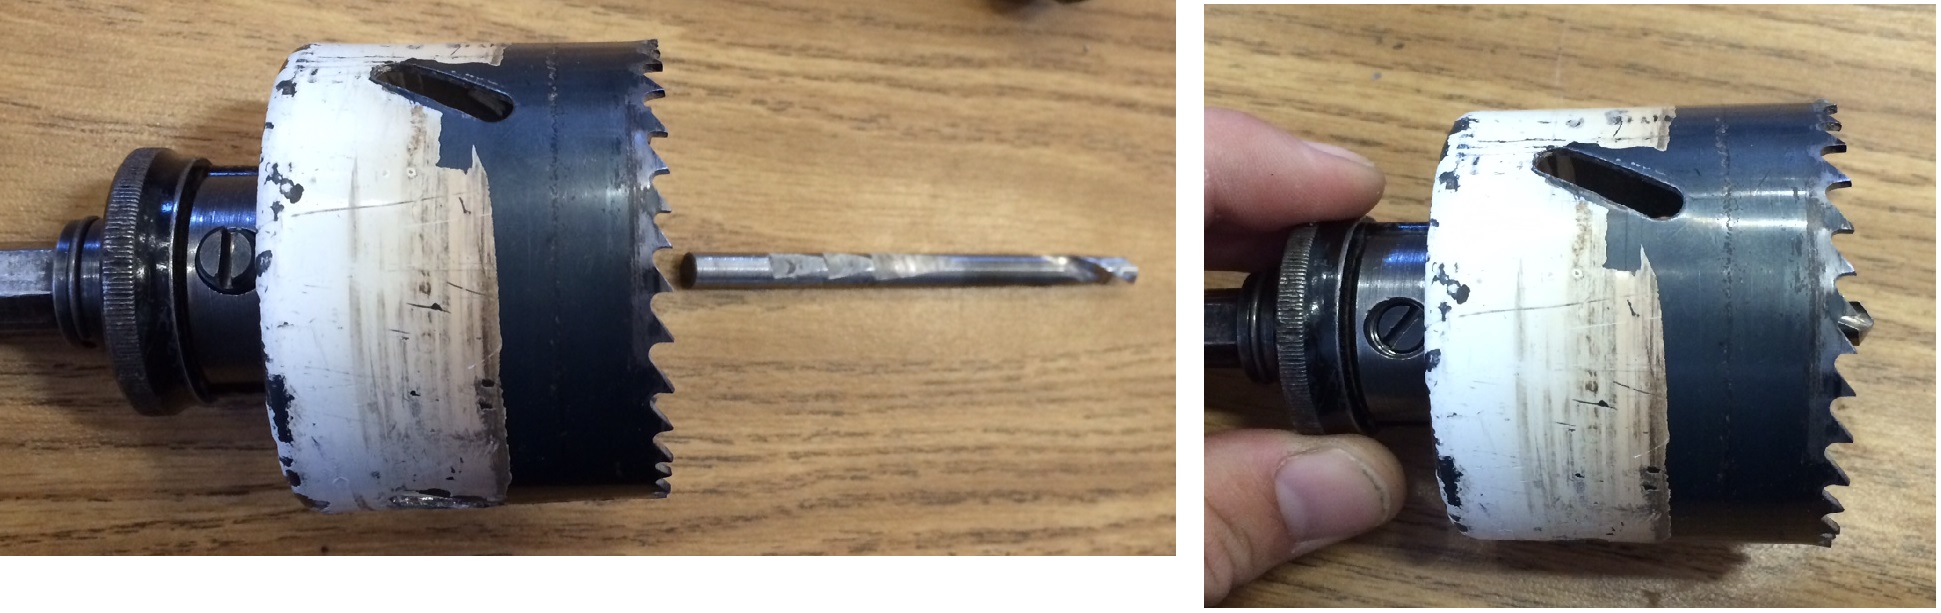
Here is the three hole saw parts

To assemble, screw the hole saw bit onto the Hole Saw Driver until it stops. Then unscrew the hole saw bit slightly until the pins on the hole saw driver align with the holes on the hole saw bit. Push the pins through the holes and it will look like the image on the right, below.

Now it is time to put in the centering bit:
Notice the flat head screw on the hole saw driver. This is called a “set screw.” This set screw is designed to pinch the flat spot on the centering bit. Be sure the flat sides are aligned with the set screw. Push the centering bit into the hole saw driver so that a little bit of it sticks out beyond the hole saw. Screw in the set screw so that it holds the centering bit in place.
You are now ready to use the hole saw as you would any other bit. The hand drills work for smaller hole saws, larger hole saws should only be used in the drill press.
