9-11-2017

Today we pause on our graphics work and begin using inputs in Python

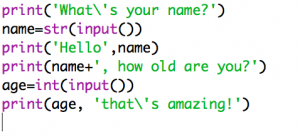
Begin by watching my Intro to Python Inputs video.  Please pause the video as it runs so that you can add each line of code.  I will also post a screenshot of the code below.  If you don’t have headphones you can turn on closed captioning.

AFTER you have watched the video and typed in the coded I’d like you to do the following:
1. add in at least TWO MORE QUESTIONS to the code that capture inputs.  Ideas could include asking where the person lives, favorite ice cream, their Social Security number, etc.

2. use the two new inputs that you have collected in responses back to the user like I did with name and age in the tutorial.  Like print(‘Do you like living in ‘,location,’?’)

3. save your work and upload it to your trinket.io account.  Share your code with me for this graded assignment.  Click here to send me your code.

9-7 & 9-8-17

tech news: Equifax gets hacked and it’s a mess
(this is the info that Equifax keeps)

today’s goals:

  1. trinket.io – this website will be the way that you turn in your Python programs for class: here’s a sample
  2. create your very own trinket.io account – as always, take steps to protect your privacy (no full name, no info about location of your home or school) -go to trinket.io
  3. send a test to Mr. Milstead by clicking here
  4. finish your Python Turtle Graphic – be sure to add comments to your code explaining WHAT the code does.
  5. send your Completed Turtle Graphic code to Mr. Milstead by clicking here.

Get a preview of our plans for next week – this guy types in six lines of code and you won’t believe what happens next!!

9-5-17

The plan for drawing a turtle graphic
Now it’s time to create your own custom graphic.  Use the provided grid paper to plan your work.
>the distance between the thick lines is 100 pixels
>the distance between the thin lines is 25 pixels
1. comments (put a hashtag in front of comment) to tell what is happening in that section of code
2. functions
3. multiple colors
4. your own work

Creating a semicircle using Python Turtle

9-1-2017

today’s agenda:

  1. changing the background of your Python graphic:
    Use this code to set the size of your graphic to 600X600 pixels AND to use an image as your graphic background. Note that you can only use a GIF as a background image.
    Use this code to change the background color of your graphic AND set the window size to 600X600 pixels.

    2. Plotting the location of your drawing:

    3. The plan for drawing a turtle graphic
    Now it’s time to create your own custom graphic.  Use the provided grid paper to plan your work.
    >the distance between the thick lines is 100 pixels
    >the distance between the thin lines is 25 pixels
    1. comments (put a hashtag in front of comment) to tell what is happening in that section of code
    2. functions
    3. multiple colors
    4. your own work

    any good program starts with a solid plan –  use the provided graph paper to plot your design

    1. each thick line is 100 pixels, each thin line is 25 pixels

8-31/9-1 2017

today:

  1. looping graphics – add this line just above calling a function:
    for loop in range (25):
  2. plotting graphics – follow this outline for successfully plotting graphics
  3. any good program starts with a solid plan –  use the provided graph paper to plot your design
    1. each thick line is 100 pixels, each thin line is 25 pixels

Your custom graphic must use:
1. comments (put a hashtag in front of comment) to tell what is happening in that section of code
2. functions
3. multiple colors
4. your own work

Want to add more? – add a background gif 
import turtle
screen=turtle.Screen()
screen.setup(500,500)
screen.bgpic(“sky.gif”)#this is the name of your file – mine was called sky.gif
line1=turtle.Turtle()

8-29/8-30-17

tech news – this is the Swiss Army knife of action cameras

today’s agenda:

  1. functions -saving time
  2. calling multiple functions

let’s begin:

  1. using IDLE, click on File, New File and write a program that creates a square. Use the code below to get you started:
  2. a function can save you all that typing/copy-pasting
  3. function structure:

4. working with two turtles – can it be done?  Yes.  Ideas?

5. your work today – create custom art using Turtle using multiple functions and colors.  Comment your work to explain what happens in each section.  Comments starts a #.

Resources:
Massive list of Python Turtle commands and code

8-27-17

Goals:
-review shell
-writing a program in shell vs a Python file
-programing a custom shape with line and fill colors

  1. Open IDLE, open shell
  2. Type in these lines in the Python shell:
  3. Add  your own lines and make a square.  HINT: what do you repeat to make a square? Did you get errors?  Check the code for spelling and punctuation.  Try again.
  4. Now…File, New.
  5. Enter the same lines into your new file to make a square.
  6. Save your file and watch it run.  DON’T NAME YOUR FILE TURTLE.  You can name it newturtle, newshape, etc.
  7. What’s the variable?
  8. Adding color:
  9. Fill the shape with color.
  10. Create shapes of your own design.

Resources and tips:
CTRL-S to save
F5 to run (also asks you to save)

Python color chart